Overview of System Analysis and Design and introductory stuff -- Software Engineering
Index
- Overview of System Analysis and Design
- Business System Concept
- Software Development Life Cycle (SDLC)
- 1. Phases of SDLC
- Example of SDLC in action
- Waterfall Model
- Classic Waterfall Model
- Iterative Waterfall Model
- Spiral Model
- Prototype Model (Extra)
- Feasibility Analysis
- Technical Feasibility
- Cost-Benefit Analysis
- COCOMO Model
Overview of System Analysis and Design
System Analysis and Design (SAD) is the process of examining a business problem, understanding the requirements, and creating a plan to develop a software solution. This process ensures that the developed system meets the needs of users while being efficient, reliable, and maintainable.
1. What is System Analysis?
-
Definition: System analysis is the process of understanding and detailing what a system should accomplish. It involves gathering and analyzing requirements, identifying any problems in the current system (if one exists), and determining the ideal features for a new system.
-
Objectives:
- Define requirements clearly to avoid misunderstandings.
- Identify constraints and limitations that may affect the design or implementation.
- Understand the user's needs and expectations to ensure the system is user-friendly and valuable.
-
Activities in System Analysis:
- Requirements Gathering: Techniques like interviews, surveys, document analysis, and observation help in collecting information from stakeholders.
- Feasibility Study: Assessing technical, economic, and operational feasibility.
- Requirements Specification: Clearly documenting requirements so they can be understood by both developers and stakeholders.
-
Importance of System Analysis:
- Reduces the risk of building a system that does not align with user needs.
- Helps in identifying any potential issues early in the development cycle.
- Sets a clear foundation and roadmap for the design and development process.
2. What is System Design?
-
Definition: System design is the process of defining the architecture, components, interfaces, and data of a system to meet specified requirements. This stage takes the "what" of system analysis and turns it into the "how" of system construction.
-
Objectives:
- Create a blueprint for the system that fulfills all requirements identified during analysis.
- Design a scalable, efficient, and maintainable solution.
- Ensure the design aligns with the business goals and operational environment.
-
Activities in System Design:
- High-Level Design (HLD): Defines the overall system architecture, including main components, their relationships, and the flow of data between them.
- Detailed Design: Specifies the internal structure and workings of each component, including algorithms, data structures, and the interfaces between modules.
- Prototyping: Sometimes, prototypes are built to validate that the design meets user expectations or to refine requirements before full-scale development.
-
Importance of System Design:
- Provides a clear roadmap for developers, ensuring the system is built efficiently and correctly.
- Reduces potential issues during coding by identifying and solving problems at the design stage.
- Ensures that the final product will be easy to maintain and enhance as the organization’s needs evolve.
3. The Relationship Between Analysis and Design
- Sequential Relationship: Traditionally, analysis comes before design. Analysis defines what needs to be done, while design specifies how to do it.
- Iterative Relationship: In modern software practices (like Agile), analysis and design may overlap. As requirements evolve or new information emerges, the system may be re-analyzed, and designs may be adjusted accordingly.
- Dependency: Good system design depends heavily on thorough system analysis. Any missed requirement in the analysis phase could lead to major rework during design or development.
Key Takeaways
- System Analysis is about understanding and defining what the system should accomplish.
- System Design is about planning how to construct the system to meet those goals effectively.
- A strong analysis sets the foundation for a sound design, which ultimately leads to a successful software project.
Business System Concept
A Business System is a structured way in which an organization operates to achieve its objectives. In the context of software engineering, understanding the business system concept is crucial because it lays out the processes, information flows, and relationships within an organization. This helps ensure that the software being developed aligns with the organization's goals and processes.
1. What is a Business System?
-
A Business System encompasses the set of processes, resources, and structures an organization uses to deliver products or services. It includes:
- Processes: The series of activities and tasks that accomplish a business goal (e.g., order processing).
- Resources: The personnel, technology, information, and finances that support these processes.
- Organizational Structure: The hierarchy and arrangement of teams, departments, and roles.
-
Purpose: The primary purpose of a business system is to optimize the way an organization works to meet its objectives efficiently, economically, and with high quality.
2. Components of a Business System
- Input: Information, materials, or other resources entering the system. For example, customer orders, raw materials, and employee data.
- Process: The transformation or processing of inputs to achieve desired outcomes. For example, converting raw materials into finished goods.
- Output: The final products or services generated by the system, which should meet customer requirements.
- Feedback Loop: Feedback from the output is fed back into the system to improve future processes and outcomes. For example, customer satisfaction surveys inform changes to improve service.
3. Types of Business Systems
- Manufacturing System: Produces physical goods by processing raw materials.
- Service System: Delivers intangible goods or services, like healthcare or customer support.
- Information System: Manages data and provides information to support decision-making within an organization (e.g., a customer relationship management system).
- Enterprise Resource Planning (ERP): Integrates multiple business functions like finance, HR, and supply chain within a single system.
4. Importance in Software Engineering
- Understanding the Business System Concept helps software engineers align their work with the organization’s goals. This ensures that the software solution will enhance, rather than disrupt, business processes.
- It aids in Requirements Gathering: By understanding the overall business system, engineers can gather requirements more effectively, ensuring that they address all critical parts of the business process.
- Improves Efficiency: Designing software with a clear understanding of the business system allows for automation and streamlining of processes, resulting in better productivity and lower operational costs.
5. Example Scenario
-
Imagine an e-commerce company that handles everything from order placement to delivery. A business system for this company would encompass the processes for:
- Customer ordering
- Inventory management
- Payment processing
- Shipping and delivery
- Customer service
-
When designing software for this business system, engineers would analyze each of these processes to identify which parts can be automated, streamlined, or improved. The goal is to create a system that reduces manual effort, speeds up operations, and enhances the customer experience.
Key Takeaways
- A Business System is a structured approach an organization uses to achieve its goals, including processes, resources, and structure.
- Understanding a business system is essential in software engineering to ensure that the software solution supports and enhances existing processes.
- Effective system analysis and design require thorough knowledge of the business system to create software that aligns with organizational objectives and requirements.
Software Development Life Cycle (SDLC)
https://www.youtube.com/watch?v=kSU2MPeptpM&list=PLxCzCOWd7aiEed7SKZBnC6ypFDWYLRvB2&index=3
https://www.geeksforgeeks.org/software-development-life-cycle-sdlc/
The System Development Life Cycle (SDLC) is a systematic process used to develop software through a series of clearly defined phases. Each phase has specific goals, deliverables, and activities to ensure that the final product is high-quality, meets requirements, and is delivered on time and within budget.
1. Phases of SDLC
a. Requirement Analysis:
- Goal: Understand and document what the system is supposed to do.
- Activities: Gathering requirements from stakeholders, defining functional and non-functional requirements, and documenting them in a requirements specification.
- Output: Requirements document, which serves as a roadmap for the development process.
b. System Design:
- Goal: Define the architecture and technical specifications based on the requirements.
- Activities: Creating high-level and detailed designs, specifying the software, hardware, databases, and network requirements.
- Output: System design documents, including diagrams and specifications, which serve as a blueprint for development.
c. Implementation (Coding):
- Goal: Build the software according to the design specifications.
- Activities: Writing and compiling code, creating modules, and integrating them.
- Output: The actual software product or application, ready for initial testing.
d. Testing:
- Goal: Ensure that the software works as intended and is free of defects.
- Activities: Conducting various tests (unit, integration, system, and acceptance testing) to identify and resolve issues.
- Output: Test reports, bug-fixing records, and a refined version of the software ready for deployment.
e. Deployment:
- Goal: Make the software available to end-users.
- Activities: Installing and configuring the software in the target environment, providing user training, and preparing documentation.
- Output: Deployed software with user access and necessary documentation.
f. Maintenance:
- Goal: Keep the system running smoothly and improve it based on user feedback.
- Activities: Fixing bugs, implementing enhancements, and upgrading the system as required.
- Output: Updates, patches, and improvements that help the software stay relevant and functional over time.
2. Importance of the SDLC
- Provides a structured approach to software development, ensuring each stage is well-planned and thoroughly executed.
- Ensures better control over projects, reducing the risk of project failure by breaking down the development process into manageable phases.
- Facilitates collaboration among team members, as everyone has a clear understanding of their responsibilities at each phase.
- Helps in managing costs, time, and resources effectively, as requirements, design, and testing are all planned ahead.
3. Popular SDLC Models
- Waterfall Model: A linear, sequential approach where each phase must be completed before moving to the next. It’s easy to manage but inflexible to changes once development has started.
- Spiral Model: Combines iterative and waterfall approaches, with an emphasis on risk assessment. Each "spiral" represents a phase, allowing for risk analysis at each stage and gradual refinement of the project.
- Agile Model: An iterative, flexible approach that involves frequent releases of smaller parts of the project. Agile is highly adaptable to change and emphasizes customer feedback throughout the development process.
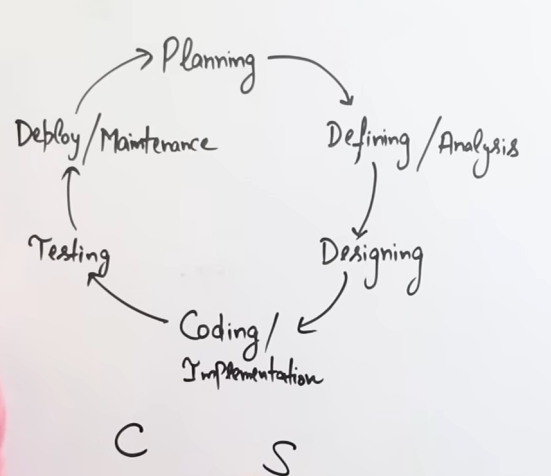
Example of SDLC in action
Let's understand this using an example : Building a school website
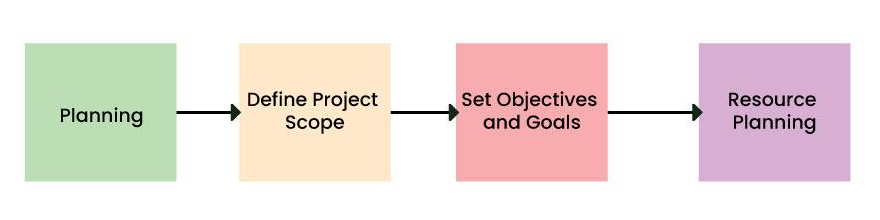
- Planning:
- What happens: Decide the purpose — we need a website to manage school activities, track student progress, and share important information with parents and teachers
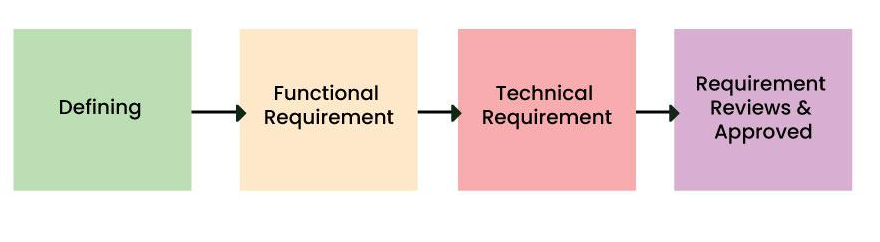
- Defining:
-
What happens: List out what each user (students, teachers, parents) needs. For example,
students need access to their assignments, teachers need to upload grades, and parents
need to view their child’s progress. -
This is fulfilled by utilizing SRS (Software Requirement Specification). This is a sort of
document that specifies all the pre-requisites that need to be defined and created during the entire project cycle.
-
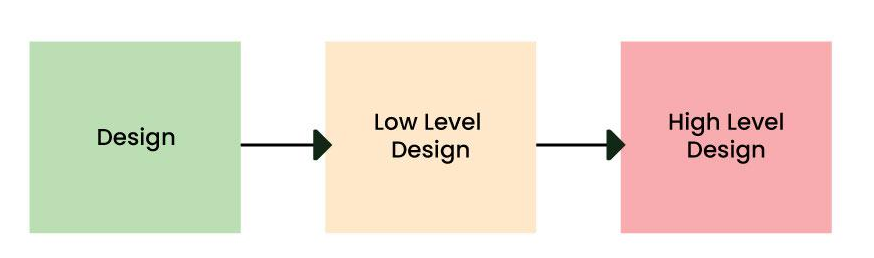
- Designing:
-
What happens: Design the layout of each page. Make simple sketches showing where the
login button, dashboard, assignments, and announcements will be displayed. -
Here SRS is a reference for software designers to come up with the best architecture for
the software. Hence, with the requirements defined in SRS, multiple designs for the product
architecture are present in the Design Document Specification (DDS). -
After evaluating all the possible factors from DDS, the most practical and logical design is
chosen for development
- Development:
- What happens: Developers start building the website by coding each section. They make sure users can log in, access assignments, view grades, and check announcements.
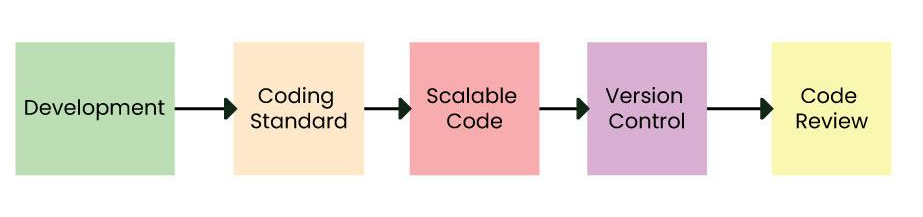
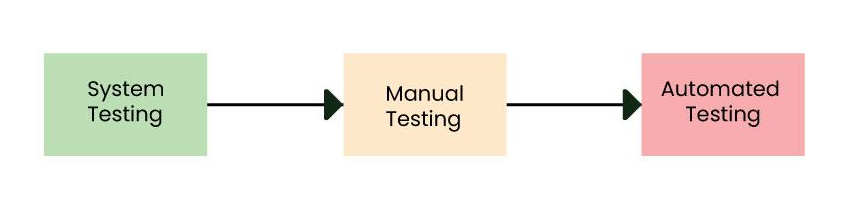
- Testing:
- What happens: Testers use the website to make sure everything works well. They check each feature, like logging in or viewing grades, works without errors.
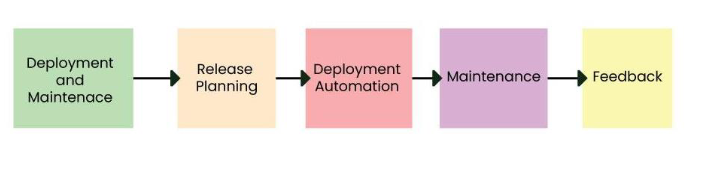
- Deployment and Maintenance:
- What happens: Launch the website online, making it accessible to students, teachers, and parents.
- What happens: Fix any issues that come up after launch and add improvements, like notifications for parents or a messaging feature for teachers.
Waterfall Model
The Waterfall Model is a traditional, linear approach to software development within the
Software Development Life Cycle (SDLC).
-
It is characterized by a structured, sequential approach to project management and software development. (Basically looks like staircase)
-
The waterfall model is useful in situations where the project requirements are well-defined and the project goals are clear.
-
It is often used for large-scale projects with long timelines, where there is little room for error and the project stakeholders need to have a high level of confidence in the outcome.
There are two types of waterfall models : Classic and Iterative
Classic Waterfall Model
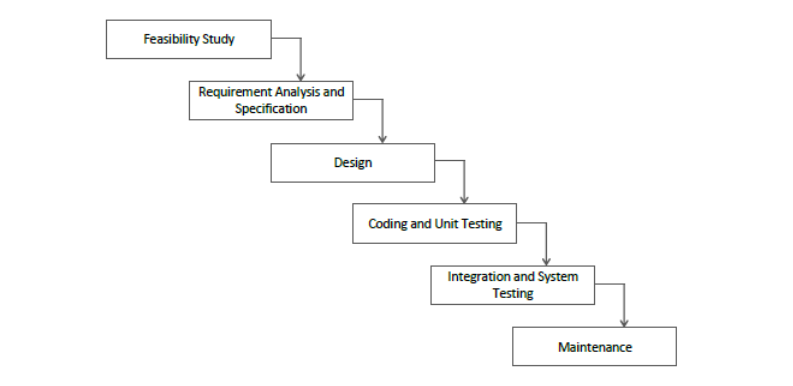
The Classic Waterfall Model is the traditional approach to the Waterfall Model and follows a strictly linear and sequential process. Each phase must be completed before moving on to the next, and there is minimal overlap or iteration. This model is straightforward but rigid, and it's best suited for projects where requirements are well-defined and unlikely to change.
Phases of the Classic Waterfall Model
-
Requirement Analysis/Feasibility Study:
- In this phase, all requirements of the software are gathered and documented. Requirements are expected to be complete and fully defined before moving forward.
- Output: Requirements Specification Document.
-
System Design:
- Based on the gathered requirements, a system design is created. This includes high-level design (HLD) for system architecture and low-level design (LLD) for detailed component-level specifications.
- Output: Design documents, including architecture diagrams and detailed design specifications.
-
Implementation (Coding):
- The actual coding of the software takes place based on the system design. Developers work on each module or component and ensure that each part functions independently.
- Output: Source code or executable program for each module.
-
Testing:
- After implementation, all components are tested to verify they function as expected. Testing includes unit testing, integration testing, system testing, and acceptance testing.
- Output: Test reports and bug fixes if any issues are found.
-
Deployment:
- The fully tested system is deployed in the target environment for the end-users. User training and documentation may be provided if necessary.
- Output: Deployed software and user manuals.
-
Maintenance:
- Once deployed, the software enters the maintenance phase. Any issues encountered are resolved, and necessary updates or improvements are made over time.
- Output: Bug fixes, patches, and updates as needed.
Pros and Cons of the Classic Waterfall Model
-
Pros:
- Simple and easy to manage due to its linear structure.
- Clear milestones at the end of each phase.
- Well-suited for small projects with stable requirements.
-
Cons:
- Inflexible to changes once the project is in the later stages, as there is no room for revisiting previous phases.
- Not suitable for complex projects where requirements may evolve over time.
- Testing phase comes late, increasing the risk of discovering major issues late in the process.
Iterative Waterfall Model
The Iterative Waterfall Model (sometimes called the "Modified Waterfall Model") is an adaptation that allows for limited feedback loops, enabling the team to revisit previous phases if issues are discovered. This model introduces a slight flexibility compared to the classic approach, making it somewhat more adaptable to changes.
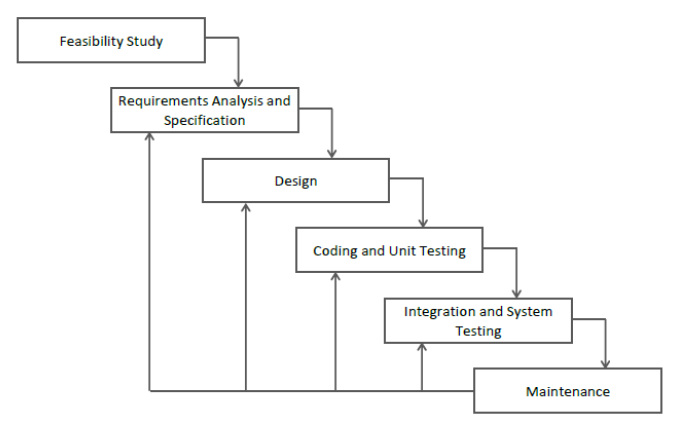
How the Iterative Waterfall Model Differs
- Unlike the Classic Waterfall Model, where each phase is strictly linear, the Iterative Waterfall Model permits moving back to a previous phase under certain conditions.
- For example, if an issue is found during the testing phase that requires a change in design, the model allows the team to go back, modify the design, and then continue with implementation and testing again.
Phases of the Iterative Waterfall Model
The phases are the same as in the Classic Waterfall Model:
- Requirement Analysis
- System Design
- Implementation
- Testing
- Deployment
- Maintenance
However, in the Iterative model:
- Feedback loops allow for a degree of flexibility to revisit and revise previous stages as needed.
- Testing and verification can be done after each phase, and adjustments can be made, though this is typically kept minimal to maintain the model’s structured approach.
Pros and Cons of the Iterative Waterfall Model
-
Pros:
- More flexible than the classic model, as it allows for limited feedback and iteration.
- Errors can be identified and corrected earlier in the development process, especially if discovered during testing.
- Useful for projects where there is some uncertainty or evolving requirements, but where full Agile or iterative methods aren’t feasible.
-
Cons:
- Still not as flexible as fully iterative or Agile models.
- Feedback loops can increase the complexity and time for development if many changes are required.
- Frequent iterations may require additional documentation and testing, potentially increasing costs.
When to Use Each Model
-
Classic Waterfall Model: Ideal for projects with well-defined and stable requirements where changes are unlikely. This model works well for small or simple projects where each phase can be completed without much overlap or rework.
-
Iterative Waterfall Model: More suitable for projects where some level of feedback and refinement is needed, but where a structured, phase-driven approach is still preferred. It provides limited adaptability, making it a good choice for medium-sized projects with some uncertain requirements.
Key Takeaways
- The Classic Waterfall Model is a strictly linear approach that works best when requirements are well-defined and unlikely to change.
- The Iterative Waterfall Model provides limited feedback loops, allowing for some flexibility to revisit earlier phases if necessary, which can help address issues earlier in the development cycle.
Spiral Model
https://www.youtube.com/watch?v=y2CnstDLhXM&list=PLxCzCOWd7aiEed7SKZBnC6ypFDWYLRvB2&index=10
The Spiral Model is an evolutionary software development model that combines elements of both iterative and waterfall models, focusing heavily on risk assessment. It was introduced by Barry Boehm in 1986 and is particularly useful for large, complex, and high-risk projects where requirements are unclear or likely to evolve.
Key Features of the Spiral Model
-
Risk Management: The Spiral Model emphasizes risk assessment and mitigation at each phase of development. Before moving on to the next phase, risks are identified, analyzed, and minimized. This risk-focused approach helps prevent costly issues later in the project.
-
Iterative Cycles (Spirals): The development process is divided into cycles or "spirals," each consisting of several phases. Each spiral results in a progressively refined version of the software, allowing for frequent feedback and flexibility to adapt to changing requirements.
-
Prototyping: In each cycle, a prototype or partial version of the software may be created. This helps with understanding requirements, identifying issues early, and ensuring alignment with user expectations.
-
Flexibility and Customer Feedback: The model accommodates changes in requirements after each spiral. Feedback from stakeholders is collected and incorporated into the next iteration, making it suitable for projects where requirements are expected to evolve.
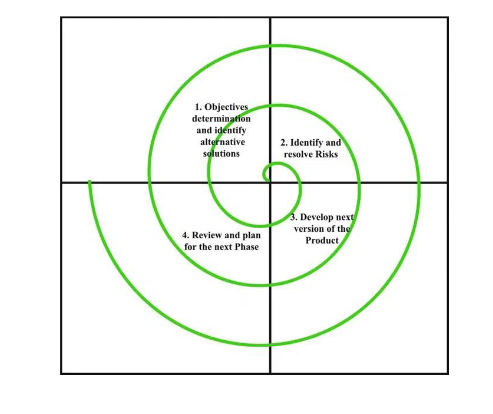
Structure of the Spiral Model
The Spiral Model consists of four main phases in each spiral. Each spiral represents a full iteration of these phases and results in either an improved prototype or a more complete version of the software.
-
Planning Phase:
- In this phase, the project objectives, alternatives, and constraints are defined. Requirements are gathered, and a rough outline of the software is created.
- Key activities include determining system requirements, estimating costs and schedules, and identifying potential risks.
- Output: Updated project plan and requirements for the current cycle.
-
Risk Analysis Phase:
- In this phase, risks associated with the project are identified, analyzed, and evaluated. This phase also includes creating strategies for risk mitigation.
- Often, a prototype is developed as part of this phase to better understand potential risks or uncertain requirements. This prototype is tested, and its outcomes are used to refine the requirements.
- Output: Risk analysis report, prototype, and strategies for minimizing identified risks.
-
Engineering Phase:
- This phase involves the actual development and testing of the software. The software is designed, coded, and tested according to the plan and risk analysis from earlier phases.
- Each iteration produces a more refined version of the product, gradually moving toward the final version.
- Output: Developed and tested software product or module for the current cycle.
-
Evaluation Phase:
- The developed software is reviewed, and feedback from stakeholders is gathered. This phase also includes a formal review of the project status and any necessary adjustments to the plan.
- Based on this feedback, decisions are made about proceeding to the next spiral or refining the current cycle further.
- Output: Stakeholder feedback, updated project requirements, and a decision on the next steps.
Each spiral completes one full cycle of these four phases, gradually moving toward a more complete product with each iteration. The model typically continues spiraling until the software is fully developed and meets all requirements.
Advantages of the Spiral Model
- Focus on Risk Management: The Spiral Model’s emphasis on identifying and managing risks makes it well-suited for high-risk projects.
- Flexibility in Requirements: Since requirements are refined in each cycle, the model accommodates changes more effectively than the Waterfall Model.
- Customer Feedback: The frequent customer involvement allows for continuous feedback, ensuring the product aligns with expectations.
- Iterative Development: Each iteration provides a tangible outcome (e.g., a prototype or software version), helping stakeholders visualize progress and make informed decisions.
Disadvantages of the Spiral Model
- Complexity: Managing and assessing risks in each iteration can be complex and may require experienced project managers.
- Time and Cost: Due to its iterative nature and focus on risk assessment, the Spiral Model can be time-consuming and costly, especially if there are many iterations.
- Difficult for Small Projects: This model is typically overkill for small projects with minimal risks, where simpler models like Waterfall or Agile may be more efficient.
When to Use the Spiral Model
The Spiral Model is most suitable for:
- Large, complex projects where risks are high, and requirements are likely to change.
- Projects where customer feedback is essential to refine requirements and expectations.
- Projects that require rigorous risk management, like mission-critical software or software with strict regulatory requirements (e.g., medical or aerospace software).
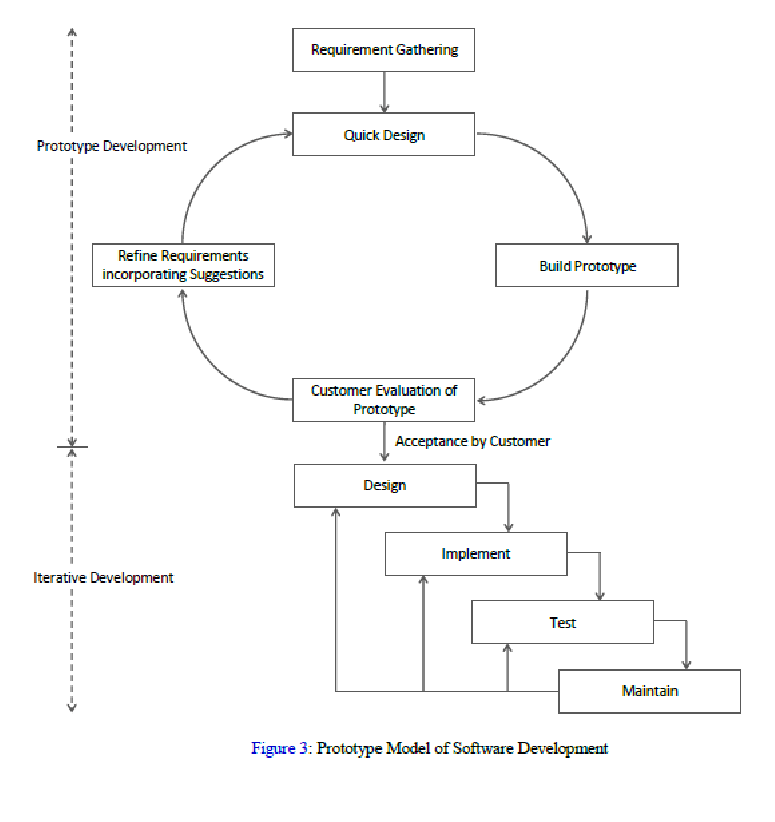
Prototype Model (Extra)
https://www.youtube.com/watch?v=nNzH2rlEH6A&list=PLxCzCOWd7aiEed7SKZBnC6ypFDWYLRvB2&index=7
-
The Prototyping Model is one of the most popularly used Software Development Life Cycle Models (SDLC models).
-
This model is used when the customers do not know the exact project requirements beforehand.
-
In this model, a prototype of the end product is first developed, tested, and refined as per customer feedback repeatedly till a final acceptable prototype is achieved which forms the basis for developing the final product.
Advantages :
-
Prototyping can help reduce the risk of project failure by identifying potential issues and addressing them early in the process.
-
The customers get to see the partial product early in the life cycle. This ensures a greater level of customer satisfaction and comfort.
-
Errors can be detected much earlier thereby saving a lot of effort and cost, besides enhancing the quality of the software.
-
Prototyping can help bridge the gap between technical and non-technical stakeholders by providing a tangible representation of the product.
Disadvantages :
-
It is very difficult for developers to accommodate all the changes demanded by the customer.
-
The prototype may not consider technical feasibility and scalability issues that can arise during the final product development.
-
The prototype may be developed using different tools and technologies, leading to additional training and maintenance costs.
Feasibility Analysis
Feasibility Analysis is the process of assessing the practicality and viability of a proposed project. Its purpose is to determine if the project is achievable within given constraints, such as time, budget, and resources, and whether it will ultimately meet business needs. It involves evaluating several types of feasibility, including technical, economic, and operational aspects.
Types of Feasibility Analysis
-
Technical Feasibility:
- This aspect assesses whether the organization has the technical resources and capabilities to carry out the project. It examines if the current technology, software, hardware, and technical skills are sufficient to develop the system.
- Key questions include:
- Do we have the necessary technology to implement the project?
- Are the required technical skills available in-house, or will we need to hire or train staff?
- Example: For a company considering a new cloud-based data analytics platform, technical feasibility would involve evaluating if they have the cloud infrastructure, expertise in data analytics, and the ability to manage large volumes of data.
-
Economic Feasibility (also called Cost-Benefit Analysis):
- This involves assessing the financial aspects of the project to determine if the expected benefits justify the costs. It calculates potential costs (both initial and ongoing) against the expected financial gains or savings.
- Key questions include:
- What are the projected costs of the project, including development, maintenance, and operational costs?
- What financial benefits will the project deliver, and will these benefits offset the costs?
- What is the return on investment (ROI)?
- Example: If a company plans to develop a customer relationship management (CRM) tool, economic feasibility would involve comparing the costs of development and deployment to the potential revenue increase or customer retention improvements the tool could bring.
-
Operational Feasibility:
- Operational feasibility evaluates how well the proposed solution fits within the organization’s operations, culture, and workflow. It assesses if the system can be effectively used by stakeholders and if it aligns with organizational objectives.
- Key questions include:
- Will the system solve the problem or address the opportunity it’s meant for?
- Is it acceptable to users, and does it fit with existing processes?
- Example: For a hospital implementing an electronic health record (EHR) system, operational feasibility would assess if the medical staff is comfortable using the new system and if it improves their workflow rather than disrupting it.
-
Legal Feasibility:
- This type checks if the project complies with relevant legal requirements, regulations, and standards. It ensures that there are no legal obstacles that could hinder or halt the project.
- Key questions include:
- Does the project comply with data protection, privacy, or industry-specific regulations?
- Are there any contractual obligations or liabilities associated with the project?
- Example: A financial institution developing a customer data management system must ensure it complies with data protection regulations like GDPR or CCPA.
-
Schedule Feasibility:
- Schedule feasibility evaluates whether the project can be completed within the given timeframe. It checks if the project timeline is realistic, given available resources and project scope.
- Key questions include:
- Can the project be completed by the deadline?
- Are there enough resources to meet the project schedule?
- Example: A software company developing a product for a seasonal event must determine if they can complete the development and testing phases in time for a timely release.
Steps in Feasibility Analysis
-
Define the Project Scope and Objectives:
- Start by defining what the project aims to achieve, including its goals, scope, and deliverables. Having clear objectives helps to focus the feasibility analysis on relevant factors.
-
Identify Potential Solutions:
- Identify possible approaches or alternatives to achieving the project goals. This can involve brainstorming different solutions or technologies that could be used for the project.
-
Conduct Feasibility Assessments:
- Perform the various types of feasibility studies (technical, economic, operational, etc.) as outlined above, to assess each aspect of the project.
-
Evaluate Risks:
- Identify potential risks, such as technology changes, cost overruns, or project delays. Analyze how these risks may impact the feasibility of the project.
-
Document Findings:
- Create a feasibility report summarizing the findings from each type of feasibility analysis. The report should outline the strengths, weaknesses, and overall viability of the project.
-
Make a Recommendation:
- Based on the feasibility assessment, decide whether to proceed with the project, adjust its scope, or abandon it. The recommendation should consider both the feasibility analysis results and the organization’s strategic goals.
Advantages of Feasibility Analysis
- Informed Decision-Making: By evaluating the project from multiple perspectives, feasibility analysis helps stakeholders make informed decisions about whether to invest resources in a project.
- Risk Mitigation: Feasibility analysis identifies risks early in the project lifecycle, allowing for proactive risk management.
- Efficient Resource Allocation: It ensures that resources are invested in projects that are likely to succeed and align with organizational goals.
- Cost Savings: By avoiding projects that are likely to fail, organizations save time and money.
Technical Feasibility
Technical Feasibility is an evaluation of whether a proposed project or solution can be successfully implemented using the current or planned technical resources and skills. This assessment focuses on whether the technology and expertise required to complete the project are available, and whether they can handle the system requirements effectively. Technical feasibility is critical because, without the appropriate technology or technical expertise, the project risks failure even if other aspects (like budget or operational fit) are favorable.
Key Aspects of Technical Feasibility
-
Availability of Technology:
- Determines if the necessary technology or equipment for the project exists and is accessible.
- Includes evaluating software, hardware, infrastructure, and tools.
- If the required technology is unavailable, the project team must consider alternatives or decide if custom development is necessary.
-
Technical Expertise:
- Assesses whether the organization has the in-house skills and knowledge needed to implement and maintain the system.
- Includes evaluating the experience of software developers, system architects, IT support, and any specialized skills (e.g., machine learning, cybersecurity).
- If there’s a skills gap, the organization must consider options like hiring new talent, outsourcing, or training existing staff.
-
Compatibility with Existing Systems:
- Checks if the new system can be integrated with existing systems, databases, and software within the organization.
- Evaluates potential interoperability issues, as well as the impact on current infrastructure.
- For example, if the new system requires a particular operating system or database structure, the feasibility study must consider compatibility and potential upgrades.
-
Scalability:
- Determines if the technology chosen can scale with increased demand or expansion of the business.
- This is especially important for systems expected to handle high traffic, large datasets, or growing user bases.
- Scalability analysis may involve assessing cloud infrastructure options, network capabilities, or modular design.
-
Reliability and Security:
- Evaluates whether the technology meets reliability and security requirements for the project.
- Reliability involves assessing downtime risks, backup systems, and disaster recovery options.
- Security considerations include data encryption, access controls, and compliance with relevant data protection regulations.
-
Technical Risks:
- Identifies potential technical obstacles and risks associated with the project.
- Includes risks such as technology obsolescence, changes in software dependencies, or challenges in integrating emerging technologies.
- Plans for managing or mitigating these risks should be part of the feasibility analysis.
Steps in Conducting Technical Feasibility Analysis
-
Identify Project Requirements:
- Start by defining the technical requirements based on the project’s objectives. This may include system specifications, performance metrics, security requirements, and user needs.
-
Assess Existing Technology and Resources:
- Evaluate the current technology stack, including hardware, software, and networking infrastructure. Identify if they meet the project’s requirements or if additional resources are needed.
-
Analyze Technical Alternatives:
- Identify and evaluate alternative technologies that could meet the project requirements. Compare each alternative for cost, ease of implementation, and alignment with organizational goals.
-
Evaluate Technical Skills and Staffing:
- Assess the availability of technical skills in the current team. Determine if additional expertise is required and if so, how it will be sourced (e.g., hiring, outsourcing, training).
-
Perform Risk Assessment:
- Identify potential technical risks, such as compatibility issues, system performance limitations, or cybersecurity threats. Develop strategies to address these risks.
-
Prepare a Technical Feasibility Report:
- Compile findings into a report, including identified technical requirements, resource assessments, alternatives evaluated, risk analysis, and a final recommendation on the project’s technical feasibility.
Example Scenario
Let’s say a healthcare provider is considering implementing an Electronic Health Records (EHR) system to centralize patient data across various departments. Here’s how they might conduct a technical feasibility analysis:
-
Availability of Technology: Assess if there are existing EHR systems that meet regulatory standards for healthcare and can be customized to the hospital’s requirements.
-
Technical Expertise: Determine if the IT staff have experience with healthcare data management, cybersecurity for patient data, and EHR system integration. If expertise is lacking, the organization might look into training or hiring consultants.
-
Compatibility: Check if the EHR can integrate with the hospital’s current systems, such as lab information systems, billing software, and radiology systems. Compatibility issues with existing databases or network systems may need to be resolved.
-
Scalability: Evaluate if the chosen EHR system can handle increasing amounts of patient data and user load as the hospital grows or adds more facilities.
-
Reliability and Security: Ensure the system complies with data protection regulations like HIPAA (Health Insurance Portability and Accountability Act) and has robust security features to protect patient data.
Cost-Benefit Analysis
Cost-Benefit Analysis (CBA) is a systematic approach to evaluating the financial viability of a project by comparing its anticipated costs to its expected benefits. In software engineering, CBA helps decision-makers determine whether a project should proceed based on whether the benefits outweigh the costs. This analysis is critical for resource allocation, budgeting, and understanding the financial impact of a project on the organization.
Key Aspects of Cost-Benefit Analysis
-
Identifying Costs:
-
Direct Costs: These are expenses directly tied to the project, such as software development costs, hardware costs, licensing fees, salaries for developers, testing expenses, and any other costs that arise specifically due to the project.
-
Indirect Costs: These include costs that are not directly linked to the project but may be impacted by it. For example, overhead costs like utilities, rent, and administrative expenses can be considered if they increase due to the project.
-
Intangible Costs: These are harder to quantify but may include factors like employee downtime, potential system failures during implementation, or reduced morale due to temporary disruption.
-
Opportunity Costs: The benefits that the organization forgoes from other projects or activities because of investing resources in this project.
-
-
Identifying Benefits:
-
Direct Benefits: These include tangible gains that the project will deliver, such as increased revenue, time savings, improved productivity, and reduced operational costs.
-
Indirect Benefits: These might include improved customer satisfaction, enhanced market reputation, or competitive advantage, even if they don’t directly result in revenue gains.
-
Intangible Benefits: These are benefits that are difficult to measure but add value, like employee satisfaction, customer loyalty, and positive impact on brand image.
-
-
Calculating the Net Present Value (NPV):
-
NPV helps in understanding the present value of future benefits minus the present value of costs, taking into account a discount rate (often the organization's required rate of return or cost of capital).
-
A positive NPV indicates that the project's benefits outweigh its costs when adjusted for the time value of money, supporting the decision to proceed with the project.
-
-
Calculating the Return on Investment (ROI):
- ROI is a metric to evaluate the profitability of the project, calculated by dividing the net benefits by the total costs and expressing it as a percentage.
- A higher ROI suggests that the project will yield better returns relative to its costs.
-
Payback Period:
- The payback period is the time required to recover the initial investment. It indicates how quickly the project will start generating net benefits.
- Projects with shorter payback periods are often considered less risky and more attractive.
Steps in Conducting a Cost-Benefit Analysis
-
Define the Scope of Analysis:
- Determine the project’s boundaries, objectives, and the timeframe for which costs and benefits should be considered.
-
Identify All Costs and Benefits:
- List every possible cost and benefit, both direct and indirect, tangible and intangible. Gather data to quantify these as accurately as possible.
-
Estimate Costs and Benefits:
- Calculate the financial values for all identified costs and benefits, using estimates, industry benchmarks, or historical data.
- For future benefits and costs, apply a discount rate to calculate the present value.
-
Compare Costs to Benefits:
- Subtract total costs from total benefits to find the net benefit. If benefits exceed costs, the project is considered financially viable.
- If comparing multiple projects, prioritize based on which has the highest net benefit, ROI, or NPV.
-
Conduct Sensitivity Analysis:
- Test how changes in key assumptions (such as cost estimates, discount rates, or expected benefits) affect the results. Sensitivity analysis helps identify potential risks and provides a range for possible outcomes.
-
Prepare a Cost-Benefit Report:
- Document all findings, including estimated costs, benefits, assumptions, and calculated financial metrics. Provide a clear recommendation based on the analysis.
Example Scenario
Imagine a retail company considering the implementation of an automated inventory management system to reduce manual tracking and improve efficiency.
-
Identified Costs:
-
Direct Costs: Software purchase ($50,000), hardware setup ($10,000), training staff ($5,000), and annual maintenance ($5,000).
-
Indirect Costs: Potential downtime during installation, estimated productivity loss ($2,000).
-
Opportunity Costs: Foregoing an investment in a marketing campaign that could potentially increase sales by 5%.
-
-
Identified Benefits:
-
Direct Benefits: Reduction in labor costs by automating inventory checks, estimated to save $20,000 annually. Reduced inventory shortages resulting in an additional $10,000 in revenue.
-
Indirect Benefits: Improved customer satisfaction due to fewer stockouts, enhancing the brand’s reputation.
-
-
Financial Metrics:
-
NPV Calculation: Using a 10% discount rate, calculate the present value of expected future benefits over a five-year period.
-
ROI: Calculate based on total net benefits divided by total costs.
-
Payback Period: Determine how long it will take for the labor savings and revenue increase to cover the initial investment.
-
-
Sensitivity Analysis:
- Test different discount rates (e.g., 8%, 12%) to see how they affect the NPV.
- Assess how variations in labor savings affect the overall ROI.
-
Final Report:
- The report concludes with financial metrics showing positive NPV, ROI of 20%, and a payback period of 2 years, supporting the project’s approval.
Importance of Cost-Benefit Analysis
Cost-benefit analysis is a crucial tool in decision-making, helping organizations make informed, financially sound choices. It enables project managers to allocate resources efficiently, prioritize projects based on financial return, and identify potential financial risks early on.
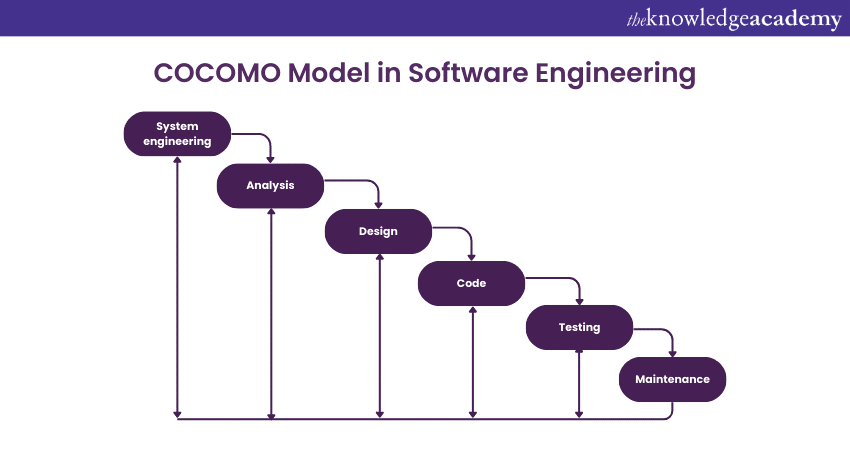
COCOMO Model
The COCOMO (Constructive Cost Model) is a cost estimation model used in software engineering to estimate the effort, cost, and time required for a software development project. Developed by Barry Boehm in 1981, COCOMO provides a systematic way to estimate project parameters based on project size and complexity.
The original COCOMO model has three primary types—Basic, Intermediate, and Detailed—each with increasing levels of detail and factors considered.
Types of COCOMO Model
-
Basic COCOMO:
-
This is the simplest form and estimates software development effort based primarily on project size (measured in KLOC - thousands of lines of code).
-
Basic COCOMO classifies projects into three categories:
-
Organic: Small, simple software with experienced teams and flexible requirements (e.g., inventory management).
-
Semi-detached: Medium-sized, more complex projects with a mix of experienced and less-experienced team members (e.g., embedded systems).
-
Embedded: Large, complex projects with tight constraints and high reliability requirements (e.g., real-time systems).
-
-
Formula:
- Effort (person-months) =
- Development Time (months) =
- Here, the values of a, b, c, and d vary based on the project type (organic, semi-detached, or embedded).
- Effort (person-months) =
-
-
Intermediate COCOMO:
-
Adds more factors by considering 15 different cost drivers like product reliability, team experience, hardware limitations, and project requirements.
-
Each cost driver has a rating (from very low to extra high) that influences the estimated effort.
-
Formula:
- Effort =
- EAF (Effort Adjustment Factor) is the product of all cost driver ratings, which adjusts the effort estimation.
- Effort =
-
The intermediate model gives a more accurate effort estimate because it accounts for more factors affecting project complexity.
-
-
Detailed COCOMO:
- The most sophisticated form of COCOMO, considering each phase of the software development lifecycle separately.
- It uses all the factors from the intermediate model and also divides effort estimation by stages like requirements, design, coding, and testing.
- Effort is calculated separately for each development stage, then combined to produce the overall project effort estimate.
Steps in Applying the COCOMO Model
-
Estimate the Project Size (KLOC):
- Start by estimating the size of the project in terms of lines of code. If you’re developing a new project from scratch, this may involve reviewing similar projects or industry benchmarks.
-
Select the Project Category:
- Based on the project’s complexity, assign it to one of the three categories: organic, semi-detached, or embedded.
-
Calculate Effort Using Basic, Intermediate, or Detailed Model:
- Use the appropriate formula based on the model type. For intermediate and detailed models, determine the EAF by rating each cost driver.
-
Calculate Development Time:
- Once you have the estimated effort (person-months), apply the time calculation formula to estimate the project duration in months.
-
Refine and Validate Estimates:
- Review estimates against any historical data from similar projects if available and adjust as needed. This validation helps ensure accuracy, especially if using the model for complex projects.
Example Calculation with Intermediate COCOMO
Let’s say you’re estimating the effort for a semi-detached project expected to have 20 KLOC.
-
Project Size (KLOC):
KLOC. -
Effort Formula (for semi-detached): Effort =
. -
Calculate Basic Effort:
- Effort =
≈ person-months.
- Effort =
-
Determine EAF: Suppose we have selected cost driver ratings that lead to an EAF of
. -
Calculate Final Effort:
- Final Effort =
= person-months.
- Final Effort =
The estimated project effort is 72 person-months.
Importance and Limitations of the COCOMO Model
Importance:
- Realistic Estimations: Provides a structured, data-backed way to estimate software project costs, especially useful for budgeting and planning.
- Project Planning: Helps managers allocate resources, estimate timelines, and plan for potential risks.
- Scalability: Can be adapted to projects of varying sizes and complexities.
Limitations:
- Reliance on Accurate Size Estimates: COCOMO depends heavily on the KLOC estimate, which can be difficult to predict accurately, especially in early project stages.
- Model Assumptions: Assumes certain development environments and team compositions, which may not hold true for all projects.
- Outdated Factors: The original model, being developed in the 1980s, might not fully reflect modern development practices like agile, continuous integration, or the use of low-code/no-code platforms.